

Learn rag quilting with this simple sewing tutorial. Create a cozy minky blanket and learn how to achieve that charmingly frayed look. Perfect for beginners!
There is something about snuggling under your favorite blanket and watching a movie, reading a book, or taking a nap.
Most of my kids have their favorite blanket but my daughter has been asking me to make a quilt just for her.
She has a quilt that her Grandma made her when she was born, but that poor thing is barely a blanket anymore. It is full of holes and I am pretty sure there isn't an ounce of batting left in it. That quilt has been very well-loved.
It is only fair that my daughter has a favorite blanket to snuggle also, so I pulled out my sewing machine and got to work.
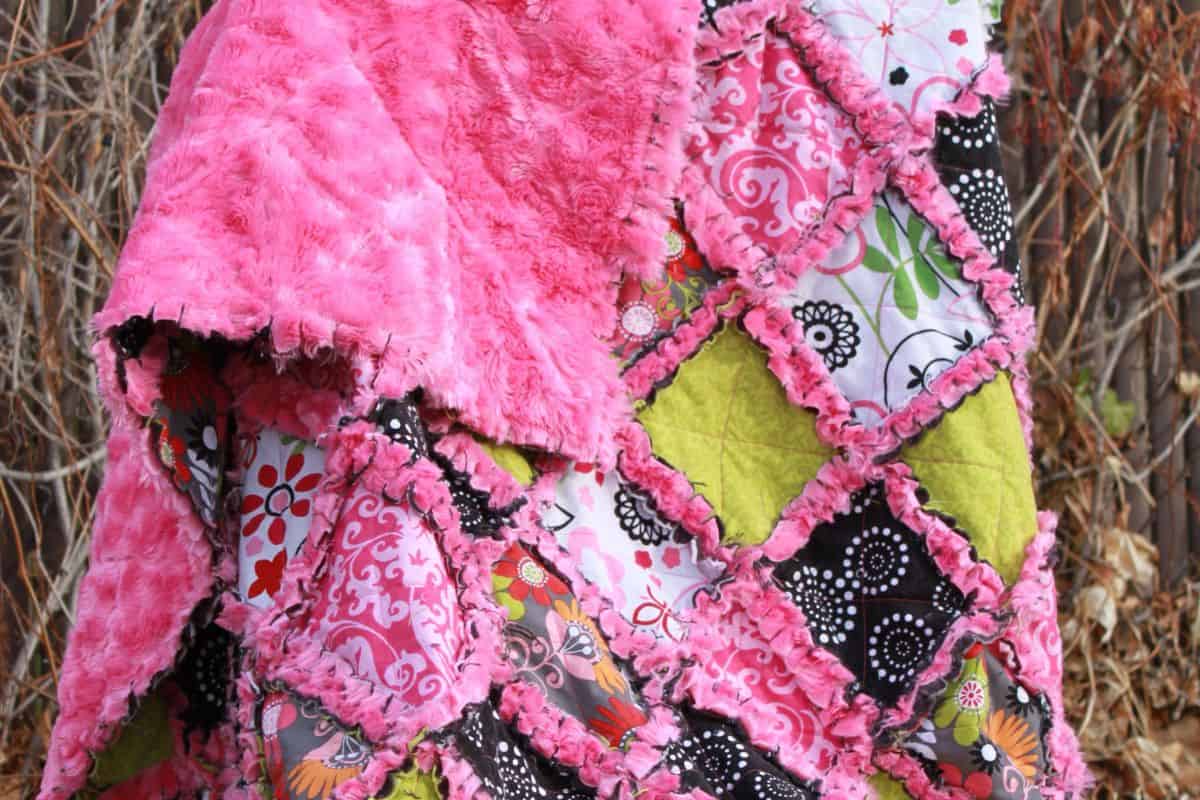
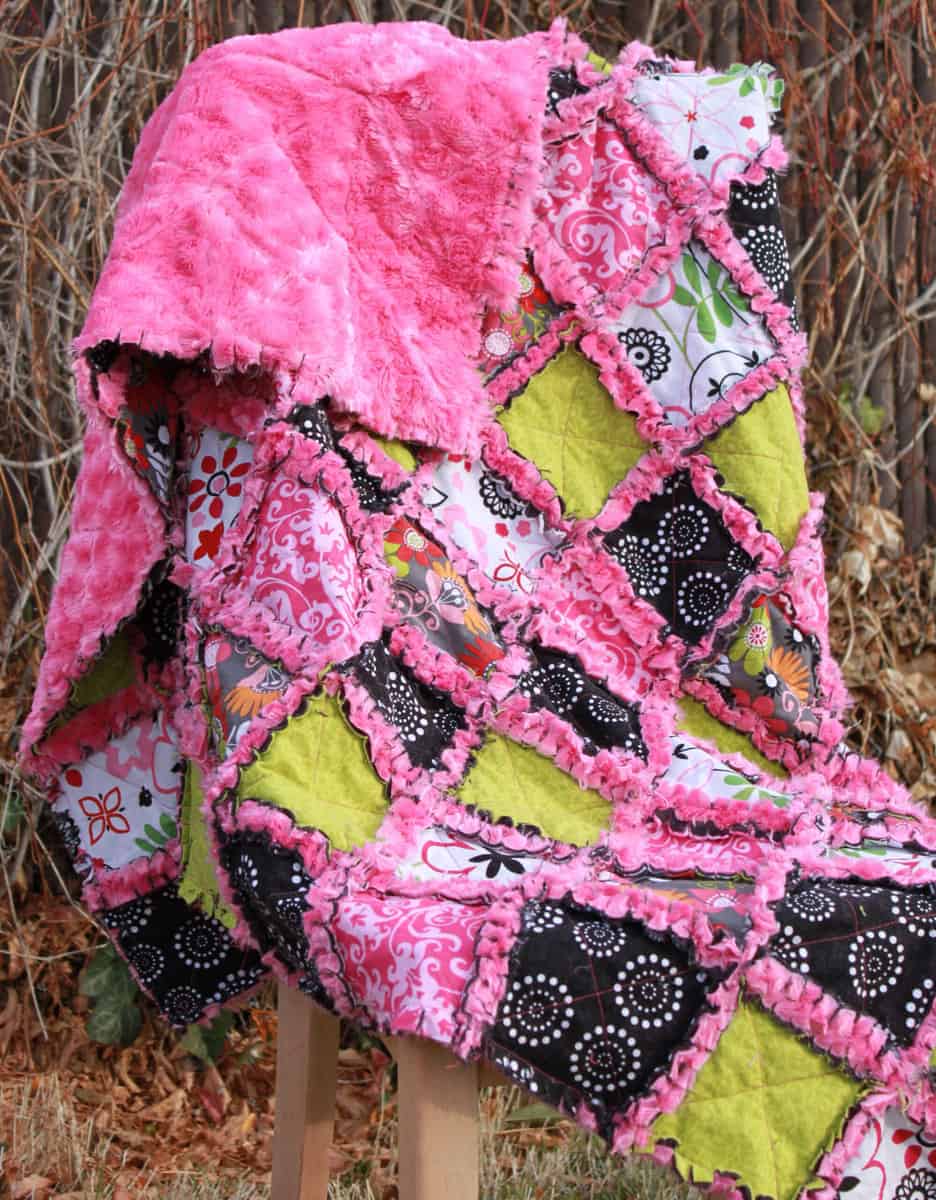
My inspiration came from Mia Dolce Originals. Isn't this a gorgeous rag quilt?
What is Minky Fabric:
Minky fabric is a very soft, plush fabric that is often used to make baby blankets, baby clothing, and baby accessories.
Minky fabric is 100% polyester and can be slippery to sew.
The fabric will shed fibers during the sewing process and the first several washes, and that is completely normal.
Rag Quilt Square Guide:
To plan for the size of the quilt I wanted to make, I referenced this chart for the Calculation of Required Quilt Squares by Jubilee Homespun Inspiration.
The chart on this website will show you the number of squares you'll need for the size of the quilt you want to make.
I went with the small (32" x 56") size quilt and 6-inch size squares.
Craft Tutorial Video
If videos are your thing, you're in luck-I've got a full tutorial ready for you!
Subscribe to my YouTube channel and stay inspired with every new project.
Supply List:
Some links may lead to similar items when the exact item is unavailable.
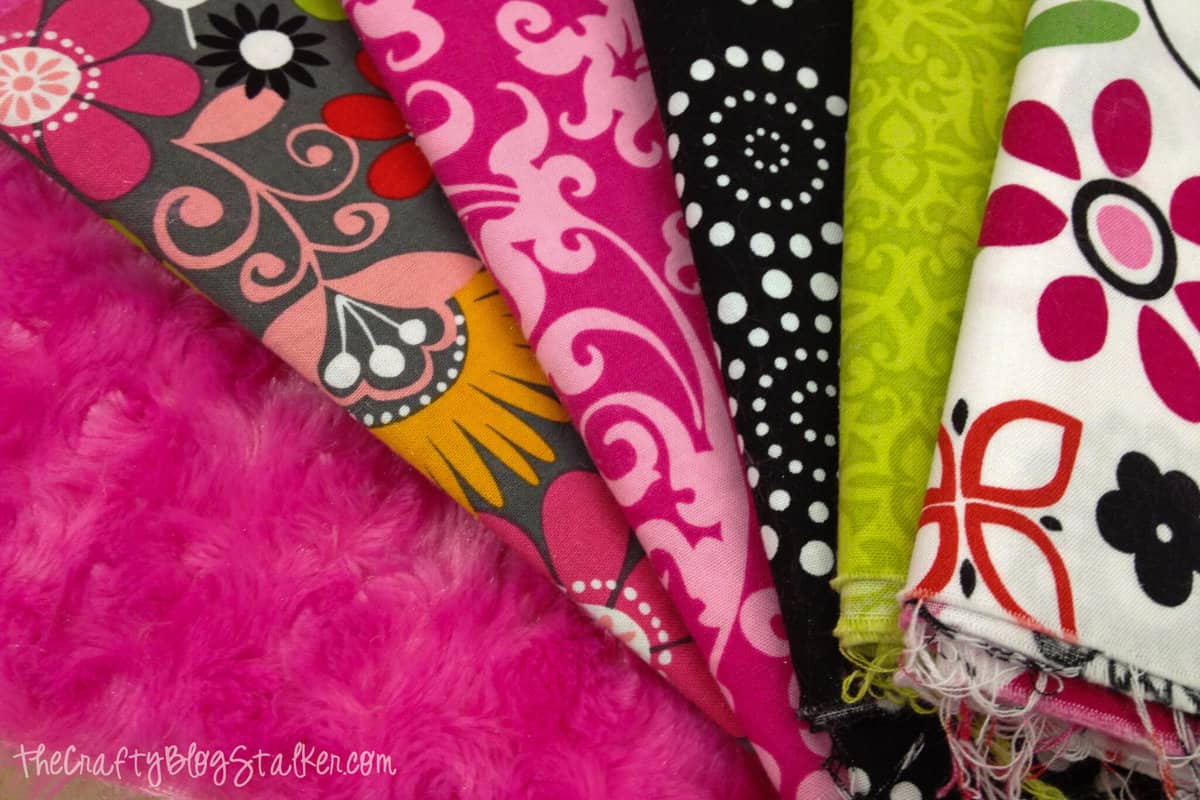
- 2 ½ Yards Minky Fabric
- 2 ½ Yards Flannel Fabric(middle layer, used as the batting)
- 2 ½ yards Cotton Fabric
- split into 5 different patterns so ½ Yard of each pattern
- or purchase pre-cut squares
Cutting Fabric:
Begin by cutting the fabric into 6-inch squares.
My quilt is 7 squares across and 12 squares down. So if you are making the same quilt as me, you'll need a total of 84 squares for each layer.
The quickest way to do this is with a rotary cutter, and quilting ruler, on a self-healing mat.
Stack all of the squares before you start sewing. This will make the layers quicker to grab.
Layer -> Minky facing down, flannel, and cotton print facing up.
Quilting Blocks:
To begin, sew an X on each square.
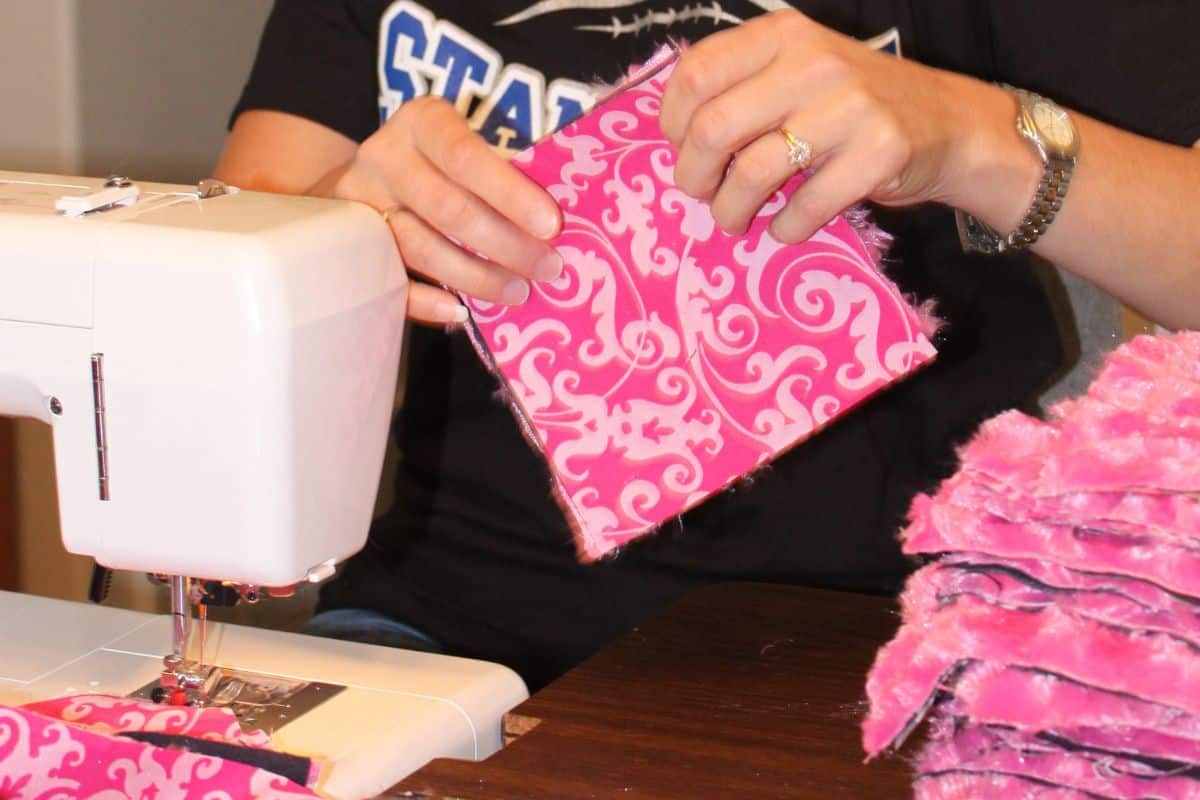
Stitch a row of blocks, corner to corner in a straight line with a single length of thread.
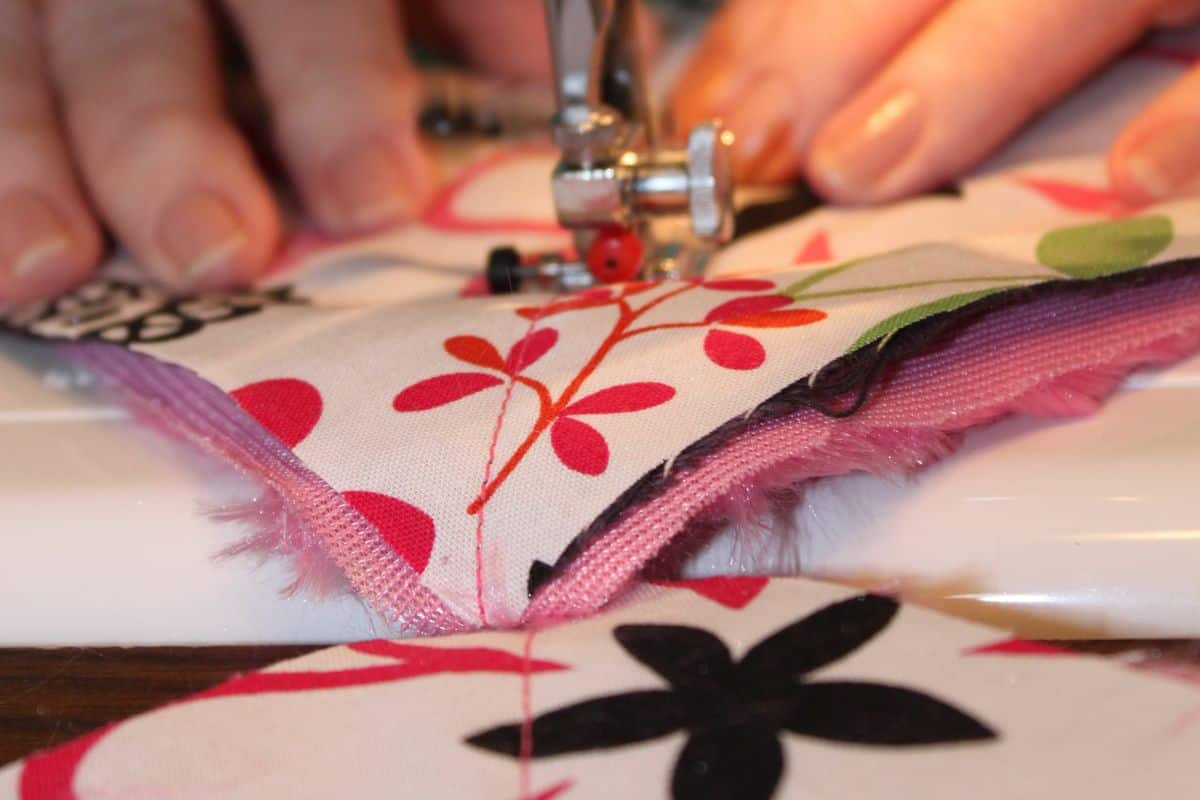
Cut them apart, and then sew in the opposite corners to complete the X on each block, and then cut them apart.
This is a big time-saver.
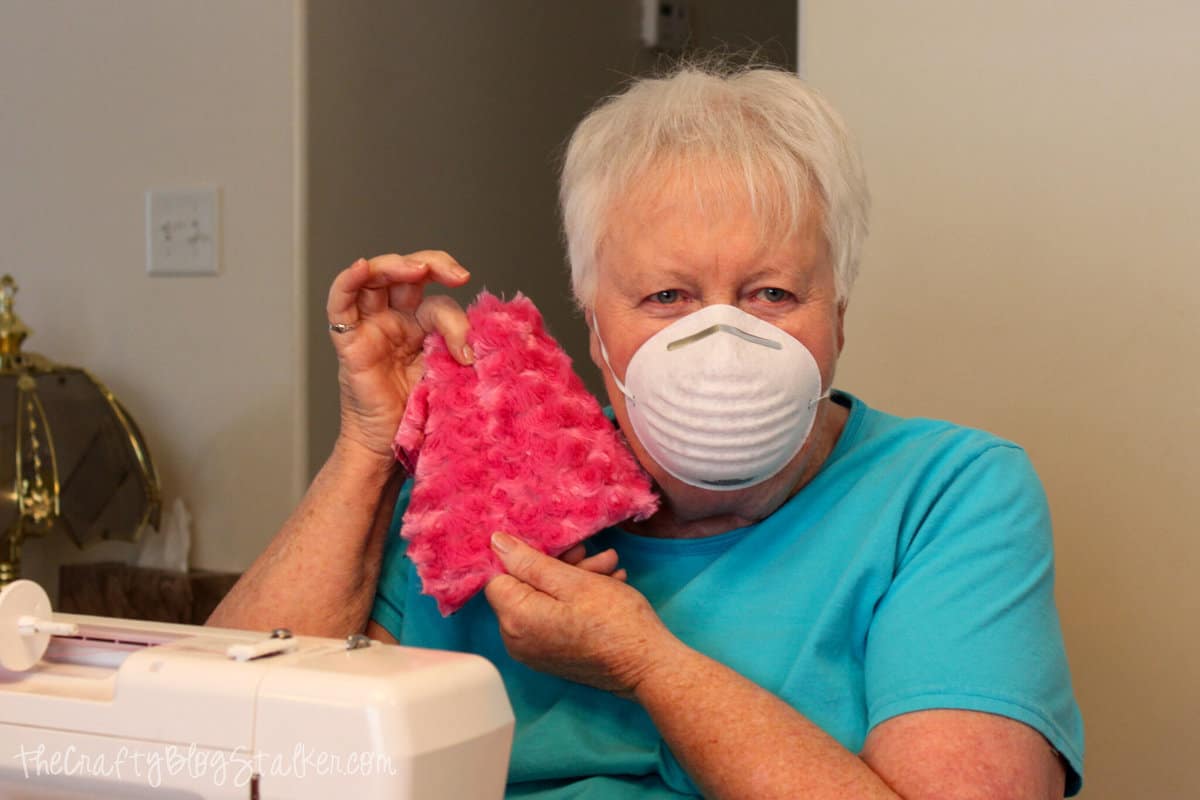
The Minky fabric sheds like crazy when you are cutting and sewing. Those little fibers get everywhere and float around in the air.
We all had a good laugh when mom pulled out a mask to wear, those pesky little fibers kept going in her nose. It was funny, but a great solution!
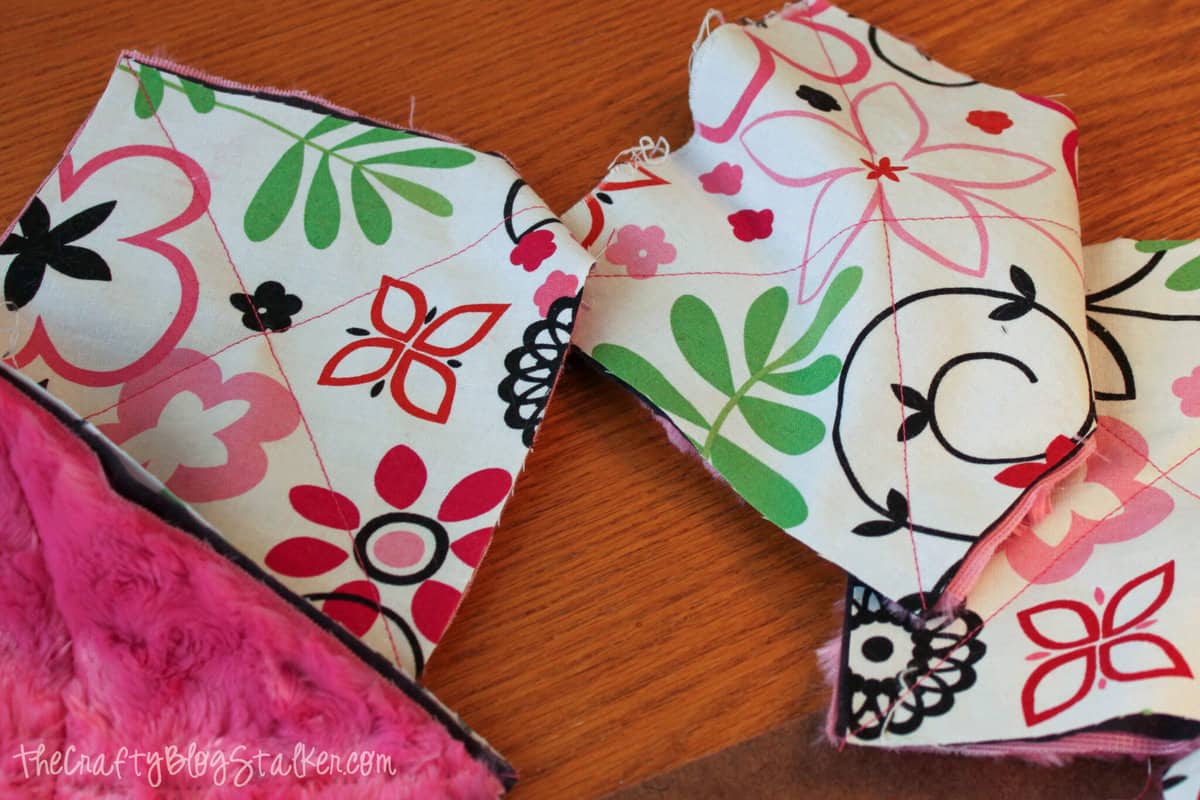
Sewing the Squares Together:
When all of the squares are sewn with an X, lay them out on the ground to lay out the pattern. Make sure no duplicate squares are lying next to each other.
Sew the layered squares together in rows, with a ⅝ inch seam allowance.
Then sew the rows together, matching up the seams of each row and column and keeping all of the seams on the same side of the quilt.
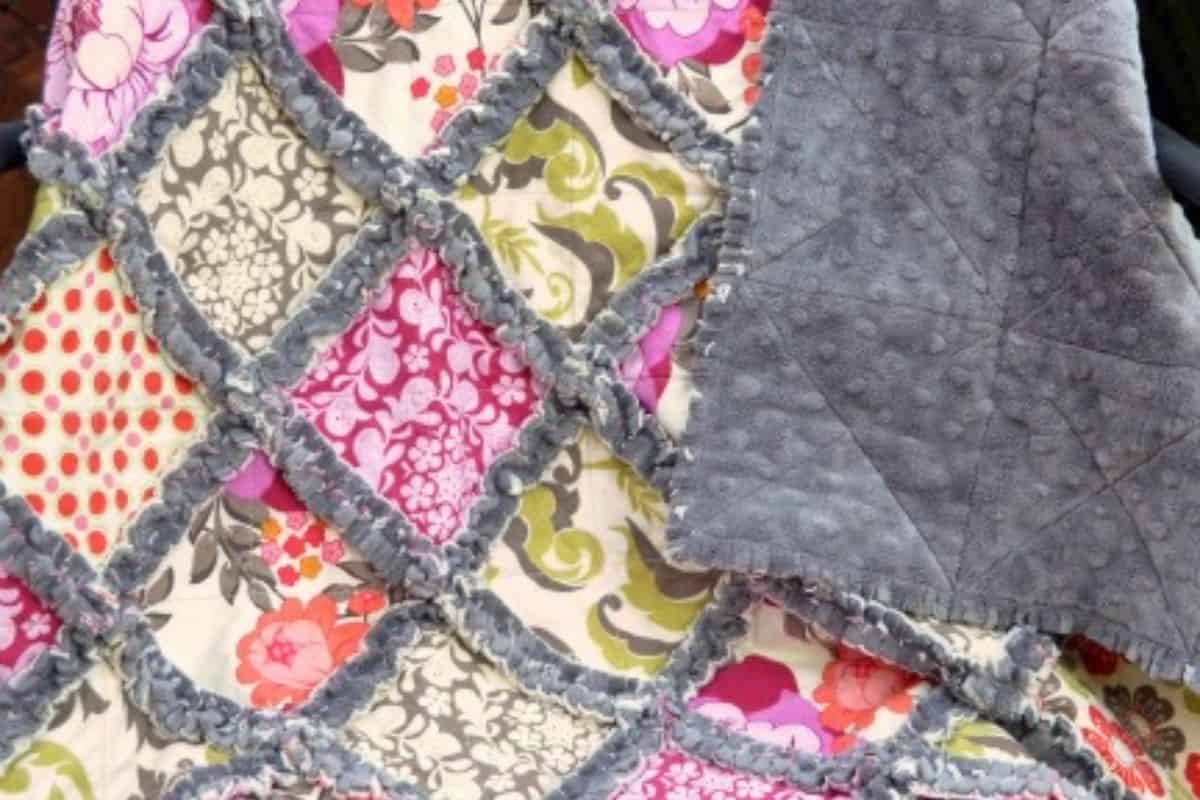
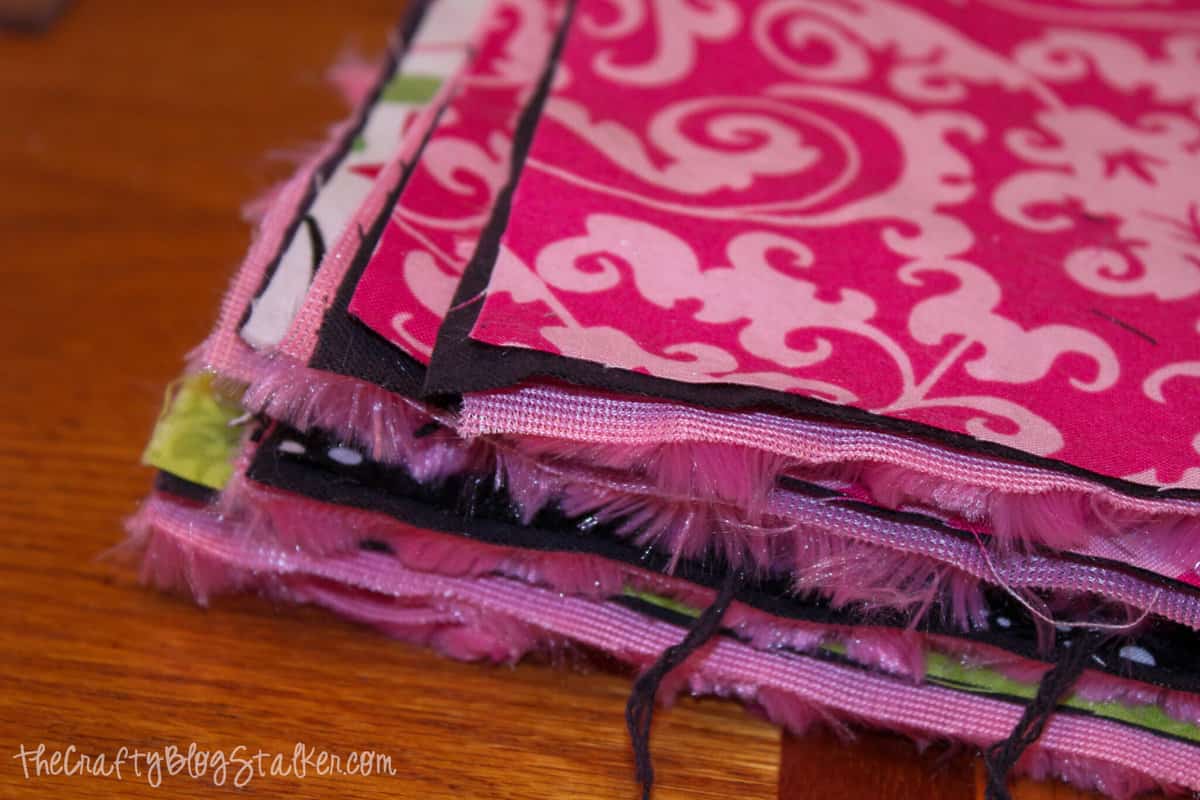
Finishing the Raw Edges:
When all of the squares and rows are sewn together, the last step is snipping those raw edges.
The prettiest part of rag quilts is the fringed edge around each square of the blanket.
To get this effect, take a sharp pair of scissors to the seams of the quilt. Snip the seam about every ⅓ inch. stopping the cut before you get to the stitched line.
This is a bit time-consuming, but totally worth it to get that frayed look.
The final step is to place the quilt in the washing machine, and then the dryer.
Trim off any loose strings, and those exposed seams will fluff up.
Every time you wash the blanket, those raw edges will become fuller and fray more.
The finished quilt is super cute and so soft. Enjoy!
Our Sewing Essentials List:
- The Sewing Machine we use is a Singer Fashion Mate and has been a great machine.
- The Cricut 18" x 24" Self Healing Cutting Mat is my favorite. Beautiful pattern on one side, and measurements on the other.
- This Rotary Cutter cuts easily and is very comfortable to hold.
- And one can never have enough Measuring Tapes! I'm always misplacing mine.
Lindsay @Artsy-Fartsy Mama
I love this!! Your fabric is adorable! Great job 🙂
Stacey
Hi
Could I substitute the minky with like a fluffy throw for a bed or sofa.
Katie
I'm not sure what you are asking, Stacey. Do you mean use another blanket instead of the minky fabric but still make a rag quilt? Depending on what the blanket is made of I think you could. I wouldn't recommend a knit blanket, but most fabrics could work.
Debbie
I would like to know if I could still make the minke rag quilt without the flannel batting ?
Katie
Yes, you can Debbie. Then it will be a nice summer blanket that won't be heavy or too warm.
Marie Coolidge
I was wondering since the minky is polyester .it will not shred . how does that look at the end when the cotton and flannel will.
Katie Adams
You are right it does not fray like the flannel does, but it does kind of curl once it has been washed. I think it looks great.
odetoinspiration
Turned out beautiful! I too sew the Mia Dolce one and loved it. So I pinned it...pinning yours too! Thanks for sharing:) Just one question, did you get the ends to create the ragged edges after you sewed all the rows together or before sewing?
Stef
I have a rag quilt clips. I go back and clip all the edges before you wash it.
Lonnie
What is a rag quilt clip and where do you get one? Also isn't the minky fabric stretchy and hard to work with?
Kassie
I am also curious about the minky fabric being hard to work with since some does have stretch to it. Any helpful tips while working with it?
Carrie
Love it!
Inspired Created Shared
You've inspired me!
Megan @ MiaDolceOriginals
Hi Katie! Glad I could provide some inspiration! Yours turned out fantastic and I'm sure your daughter will absolutely love it 🙂
Mandy
Hi Katie, I will be featuring your daughter's minky tonight on Project Queen! I LOVE IT! Question: what do you mean that you sewed the squares in a chain in the took them apart. You lost me on that one ;-). I'd like to make one of these for my daughter. Thank you Katie!
Susan
Mandy, what she means is that as she sewed diagonally across the squares, she went from one block to the next without cutting threads in between. Don't overlap the blocks--leave a tiny bit of space between them. Once you have finished sewing across lots of blocks, snip the threads that connect the squares and sew the other direction (for the x) and then piece them together!
Linda Wasko
Oh wow. I was wondering the same thing. Thanks for the explanation!
Janine
This lovely - what a great gift for your daughter 🙂
Katie @ The Crafty Blog Stalker
Thank yous Susan, you are exactly right in answering Mandy's question.
connie
Katie,
How did you get the minky to show more in the middle than the flannel and the cotton? I like the pink outline, but when I make rag quilts I get a mixture of blended colors.
Katie
I think the pink shows through more becuase the minky is a thicker material. The more it is washed the more the fabrics blend and you can see more of the other layers.
Connie
Thank you
Karen
I’m curious to how the cotton frays? I’ve only ever used flannel for rag quilts.
Katie Adams
It frays just as nice.
Jan
You don't see the flannel because I get was cut smaller and is "inside" the square and not part of the seam. So you really are only competing with the cotton to show.
Michelle
How did you create the "frayed" look?
Anonymous
Put the squares together minky side together and stitch about 1/4-1/2 inch. probably 1/2 for this fabric. Continue to stitch together in this manner and all the squares have this frayed edge appearance. The other side of the quilt is smooth. Clear as mud?
GotQuiltz?
This is so stinkin' cute. You have inspired me to finally make one. I have been wanting to make a rag quilt for the longest time but just couldn't find the perfect idea...until now! I can't wait for this weekend to get started 🙂 I'll post a picture once it's done.
Amelia
I LOVE THIS QUILT! However, I don't understand how you got the 'frayed' look. I saw it was explained earlier but I still don't quite understand how you were able to do that... can you explain? this quilt is definitely my next project =)
Katie @ The Crafty Blog Stalker
When you sew all of your squares together you will have a side where the seams are and the flat side (which was my minky side). Then you take a pair of scissors to the side with the seams (which is the side with the different colored fabric blocks) and make little cuts down to the stitch line. I cut about every 1/3 inch. Then when you wash it all of those raw edges fray in the washer & dryer.
I hope that helps. If you have any more questions please feel free to ask.
GrandmaSue10
When you make your cuts to get the frayed look, don't get too close to your seam stitching. Also, when you wash it and dry it, take a minute to clean your dryer lint catcher 1/2 way through. There is a ton of threads that fall off from the little snips.
Anonymous
Thank you so much ! I bought my fabric the other day and I'm making my first quilting attempt =)
Wish me luck!
Anonymous
Did you wash your fabric before cutting and sewing?
Katie @ The Crafty Blog Stalker
I would suggest yes. Otherwise the seams will pull away after several washings and will get holes.
Anonymous
thank you 🙂
Anonymous
Since the top is 100% cotton? will it shrink if not washed before hand?
Jan
Yes, you should preshrunk the cotton and flannel for sure. I don't think the minky shrinks (polyester material) You will be washing it all the end get the frayed seams
Brenda
I've made over 50 rag quilts. Some were all flannel n some were all cotton. Some were 7" sqs for babies. Most were 9" sqs. 7 across n 9 down. I never washed the fabric before sewing. I also made one for a queen bed. These are the most fun quilts to make.
Jetta
Do you use flannel for the middle layer, or can you use batting?
Katie
I used flannel. I wouldn't recommend using batting because the edges of the batting will peak out through the seams. Thanks for the great question Jetta!
Waveyone
if i want a fluffier quit i do use batting but i cut it 1 1/2 inches smaller than my top and bottom blocks so when i sew it the batting doesnt show
Katie
Yes, Waveyone. I think that would work!
Anonymous
How many squares across and how many down? Also, What are the measurements of this quilt? I love it and wanna make one.
Katie @ The Crafty Blog Stalker
my squares were 6 inches square and I did 8 squares by 11. The total size is about 32 x 44 inches. But it could easily be made bigger, just use more squares!
Jackie
If I want a 36 in. by 48 in. baby rag quilt, I would need 48- 7 X 7 in. squares. Once sewned together with 1/2 inch seam, you end up with 6 by 8 rows. Doesn't matter how many colors you use. 1 yard of fabric (45 in. ) will give you 30 - 7 X 7 squares. 3 colours: you will need 16 pieces of each and 6 colours you will need 8. . Same thing for the back and middle. (48 pieces) each layer. In other words, always keep in mind that one yard gives you 30 squares. This will help calculate the yardage you need depending on how many colours you want to use.
Katie
Thanks Jackie!!! You know your quilting stuff!!!
Q @ JAQS
I featured your beautiful blanket today 🙂
Thanks for joining JAQS Studio Linky Party!
Anonymous
You should do a quick You tube for those of us sewing challenged folks. I need to see the steps to retain it...
Anonymous
Is the batting in the middle, the same 6 inch square size? and of so, does it stick out and show on the frayed edge?
Katie Adams
I used black flannel as the batting and cut it the same 6 inches so it did show. Thanks for the great question!
Jan
You cán cut it the same size or cut it smaller (for inside the block). You would cut it just shy of the sewn seam allowance. It stays in place with the quilting on each block. Just depends if you want the flannel to show or not.
Anonymous
This quilt is so cute! I am wanting to try it out, but I have a quick question. How did you get the frilly look between all the squares?
Anonymous
You said the minky shedded a lot durin gutting and sewing, how did it do afterwards? Does is still shed after the quilt is finished?
Katie Adams
When I was all done sewing I threw it in the washer and dryer to get all of the access shed off, and to "fluff" the edges. My dryer lint catcher was absolutely full and bright pink! I haven't had a problem with it shedding since.
neva
hi i hope its ok to leave this comment. i was reading your tutorial and the comments after. love the idea by the way. i've made rag quilts in the past with just flannel but had been curious if minky fabric would work so this is great. with the funny story about your mom and her mask and all the talk of shedding it reminded me of something ive come across in my own sewing that i thought might be a helpful reminder or tip for anyone trying rag quilts. i've only done them with flannel so far but those little frays of fabric that drive us nuts in the process of all this also tend to make their way into your sewing machine and its a good idea once in a while to just open the compartment where your bobbin goes and at least blow it out or take a little brush like ones you get to clean electric razors/ clippers with and wipe it out. if you dont you may end up with problems i personally noticed that my stitching would start to get knotted on one side and my thread was constantly breaking like my tension was off or something.
Katie
Yes! Great tip Neva! I agree it is important to clean out those little threads and dust bits from the bobbin area! Thanks for the reminder. <3
Gail O'Toole
That was my question exactly. I made a minky quilt once and all those little fuzzies drove me nuts. I would have never in a million years used it for a rag quilt just for that reason. Good to know that it doesn't keep shedding after put in the dryer
Christine
I've seen these made with all flannel, it looks like you used quilting cotton for the patterned fabric- did that work just as well for fraying? It looks great!
Katie Adams
The cotton fabric still frays very nicely. The minky fabric doesn't fray but the edges do curl and it still looks very nice.
Anonymous
Question: Minky is not soft on both sides so how does that look on the frayed edges? Is is softer after washing?
Jenell
Katie Adams
You are right the other side of the minky is not that soft at all but you really don't feel the other side. When the raw edges are washed they kind of curl on them selves you don't feel the rough other side.
Thanks for the question!
Anonymous
I love this blanket and can't wait to make one for my daughter. I'm sort of a beginner, but ambitious sewer, so I was wondering, how many yards of the minky fabric did you have to get for the back of the blanket?
Katie Adams
It really depends on what size you want to make. This website http://jubileefabric.com/rag-ragged-quilt-instructions-tutorial.html will help you figure out how much fabric to buy.
Beccalee
I would suggest that you do not use minky if you are a beginner. It will drive you crazy and it shifts/slides when you are sewing.
Anonymous
Loved your quilt. If you do not use cotton flannel, will the quilt fray as nicely as yours did? Is the quilt heavy? How did you wash your cotton fabrics, separately or in the washing machine. Any particular detergent?
Thanks for your tutorial. I too saw the rag quilt on Mia Dolce's blog.
Katie Adams
It is hard to say. All fabric frays differently. The quilt is thin but is still pretty heavy so it is a nice warm blanket. I wash all the fabrics separately before I put the quilt together and then washed again after. I use tide but detergent would work.
Thanks for the great questions!
Anonymous
Thanks for replying to my question. Did you also prewash the flannel? Did you use a contrasting thread to sew the pieces? The black flannel that you chose makes your quilt pop. I will use flannel too in addition to the cotton and minky.
Thanks
Katie Adams
I did prewash the flannel. I used Pink thread on the entire blanket. So it would blend in the minky but would pop on the patterned cotton fabric on the front.
Kimberly Stover
I absolutely love your quilt. I think the colors are fantastic. I think I just figured out what my boys are getting for Christmas this year. Matter of fact, I may go fabric shopping this weekend. I hope I can find some appropriate "guy colors" for them. Now time to check out your other ideas.
Katie Adams
I am so glad you like it. I would love to see what you come up with!
The Lowell Family
This may be a silly question . . .Did you use 5/8 seams when you sewed everything together?
Katie Adams
Not a silly question at all. Yup. 5/8 seam with everything.
The Lowell Family
Thanks so much! I'm making one for my niece who will be arriving in January!
Katie Adams
Great! I would love to see what you come up with!
blissfulsewing
T his is awesome!!! Thanks for sharing!
Sara @ My Merry Messy Life
Wow, this is gorgeous! And I just love that it was a family craft! Memories in the making. I have got to make one of these! Thanks for sharing at Hookin On Hump Day!
Ann Liliana
I just read your entire tutorial and comments. That's so nice of you to answer all those questions. It's like an FAQ section built in to it! Hmmm JoAnn is having a sale today. What the heck I got laid off last week might as well make myself useful. Who knows, maybe I'll sell a few to friends for some much needed income. Really like it!!!
Zi Zi Bright
I am so glad that I read this before getting fabric. I was told I had to use all flannel. Being able to use a cotton top give me soooo much more choice it fabric...Thanks. I will post my finish to my blog when finish with a link to you..
Zi Zi
Unknown
How long did this take you?
Katie Adams
I don't know exactly how long because I had help, But I cut all the squares in a couple hours and then the next day got it all sewed together but at any given time I had 4 other helping hands. So I can't give you an exact time. Sorry.
Simplee Sue
I started a quilt that you make with squares 8 years ago. Started...it's not complete yet. This one looks so easy and really beautiful. I would like to try one of these. thank you for sharing.
Nicole Buckingham
wonderful project. too cute, your mom in her minky preventing mask. How is it I'm not following this awesome craftiness here yet? I most certainly am now.
Aloha,
Stopping by this sweet Monday to meet a new friend and follow along on your adventures. If you're up for a bit of a ride, we're riding the wave of life at Local Sugar Hawaii and I would love, love, love it if you'd join me for the fun.
xo,
Nicole
localsugarhawaii.com
Mystika Faith
I absolutely love the quilt!
I'll definitely be making one for my daughter sometime soon.
~Mystika Faith (www.monstersgonewild.ca)
Alison
The quilt is beautiful! I just ran across your blog and I can't believe I haven't found it sooner!
-A. Nieman
aniemandesign.blogspot.com
Marcie
I love these quilts but I would never have the patience to make one. Me and the sewing machine do not like each other. Beautiful, thanks for sharing on "I Gotta Try That"
Marcie
Susan Ramsayworldpresscom986
You just tell your sewing machine, "I am he boss of you>" Don't rush and remember we all make mistakes. If you take your time, though, you will reduce the number of mistakes.
I am looking for how to fringe the corners? I am at the fringing stage, and I am afraid I'll cut off too much fabric..
Katie
Ha ha, that's right, Susan! If you are to the fringing stage you are almost done!! Don't stress about the fringing, just make sure not to cut past the stitch line. I bet your quilt is beautiful!
Debi @ Adorned From Above
This is beautiful.
Debi
Our Delightful Home
The quilt turned out ammazing! Thanks for stopping by, and linking up to " Show Me What You Got Tuesday's at ODH".
Mrs. Delightful
Libby
Hi, stopping by from Make It Pretty Monday. This is such a fantastic rag quilt. I've not made a rag quilt before, but I've been meaning to for a while. And I'd love to get a chance to work with minky fabric. The to-do list is getting too long. lol Great tutorial!
Natalie B.
So sweet!
Thanks for sharing on Tutorial Thursdays.
x
Natalie
Sarah
So cute!!! I love the colors and patterns you used.
Nicole Tarver
Did you use regular old flanel for the batting or a quilters batting?
Katie Adams
Yup just plain flannel, nothing fancy.
Anonymous
How do you finish the outer edges?
Katie Adams
You do it just the same as the raw edges of the quilt. Sew around the edges of the quilt 5/8 in and then cut your slits every 1/3 inch up to but not over that 5/8 sew line.
Great question! I hope that helps.
Anonymous
Do you find the minky fabric still shreds when she uses it? it is BEAUTIFUL!
Katie Adams
I wash and dried it a couple times when I was done sewing it and I haven't noticed any more shedding.
Shirley
Is the quilt warm enough with the layer of flannel as the batting or do you think I could add and additional smaller square of cotton batting to each square for more warmth and weight.
Katie Adams
The blanket I does have a nice weight to it, but if you did want to make it a little bit warmer you could easily add some batting to make it even warmer.
tera stewart
Forgive me. Maybe this is because I have never sewn a quilt before. I dont know what you mean by flannel batting. And also the instruction skipped the part on how to get the cotton squares with x's onto the hot pink fabric..? So confused on the exact procedure. I obviously understand with a sewing machine...but (in the picture) the back of the pink fabric looks like x's were sewn into it. So am I correct to assume that you sew each cotton square onto the pink fabic around the perimeter and also across the x seam previously stitched? Amd then leave half an inch of pink fabric space and start sewing rhe next cotton square in the same manner?
Katie Adams
Tara, all great questions. I used flannel as the batting instead of the traditional white thicker batting. I also layered each square with the minky, flannel and then cotton and sewed the X on each square before I started sewing them all together. I hope that helps!
Mhmama
Katie, your rag quilt is really beautiful. I love that you used Minky as I haven't tried that yet. I started a Facebook page for rag quilters. It has really helped as some of us are novice and others have been making rag quilts for a long time so we all sort of help each other. Some of our quilters have made jean rag quilts and we even have a couple that make rag quilt purses. It is amazing how many creative ways one can use the rag quilting method.
threeundertwo
I love how this looks with minky! You didn't need to use a walking foot?
Katie
I did not use a walking foot, but it isn't a bad idea to.
Anissa carlisle
Hello!
I've been looking for one of the fabrics you used in your minky blanket. It's the gray floral. Do you happen to know the designer or name? I would love to have more! I've made a rag quilt but my daughter wants to make a minky now. Thanks, Anissa
Katie
I don't know the designer name but I can tell you that I got it at Hobby Lobby. I went online and looked and I didn't see it but I did buy it over a year ago. I am sorry I am not much help.
nita gossett
I would like to know how u finish the outside edges of the rag quilt. Do u sew around it?
Katie
Yes, that is exactly what I did.
Vickie
I love this blanket and am planning my Christmas projects with this in mind for both my daughters, grandaughters and maybe even one for myself. LOL How much fabric did you buy of each design on the front. Looks like you have 5 different fabrics and the minky.
Katie
The quilt took a total of 7 1/2 yards of fabric. 2 1/2 yards for each layer, the minky, flannel for batting, and the cotton fabric for the top. For the 5 different fabrics I bought a 1/2 yard of each pattern.
Vickie
Thanks, Can't wait to get started.
Vickie
What kind of machine are you using, my mending machine did ok on the squares and then the first strips but busted on the the final stage of sewing the strips together. What machine can handle the thick layers?
I'm literally at the tale end of this project and don't have alot of money to buy a new machine. Any advice would be appreciated.
Katie
I don't know much about different sewing machines, so I am not going to eb a lot of help. I use a brother and know it wasn't very expensive. You could alse check the tension of your thread. It might be to tight.
GrandmaSue10
Can you adjust the presser foot pressure? On most machines there is a thumb screw on top where you thread the little arm that goes up and down and in turn, makes the needle go up and down. Try turning it 1/4 turn. I am not sure if you need to go with more pressure or less, but I'd bet on more.
Pam Phelps
I'm wanting to make a weighted blanket for my son in this fashion. Any suggestions on how to do the squares and fill with poly pellets? Is the x stitching necessary?
Katie
I have never used poly pellets as a batting for a quilt before so I am not quite sure how that would work. The x stitching is to keep all three layers together, but if you don't have the middle layer than you would probably be fine to skip it.
Gail
Can u make it minky on both sides and rag it too?
Katie
Yeah, you could put the minky on both sides. Ohhh it would be nice and cuddly!
sherena
How does the Minky hold up over time? Does it continue to shed beyond the seams?
Katie
The minky holds up great. It only sheds for the first couple of washes.
Marisol Cuellar
Loved your tutorial!!!! This is my FIRST time sewing and I did it!!!! I made this one.... your tutorial was so easy to follow... and I don't blame your mom for wearing that mask!! OMG that pink stuff was EVERYWHERE!!! Don't know how to post my pic here but I will email it to you!!
Jessi
what was the finished size?
Katie
It was 30 x 54 inches.
pam
I've made rag quilts before with flannel and minky. Is this one made with minky, cotton quilting material and batting? Thank you
Katie
I used flannel as the batting. So layered it was minky - flannel - cotton
Danielle
Would you recommend not using a middle "batting" of flannel if I wanted a thinner blanket? I'm making this as a blanket for my daughter due in a month and don't need anything too warm. Would it be too thin without the flannel? Or if I used a layer of flannel and a layer of Minky? Thanks for the help, and awesome tutorial!
Katie
My blanket uses flannel as the batting and the minky on the back. If you wanted a thinner and lighter blanket I think you could easily skip the flannel in the middle and just have cotton on one side and minky on the other. I think for a newborn that is a great idea.
Kathy laforce
Did you put batting in between the layers?
Katie
I used flannel as the batting and put that in between the two layers of minky and cotton print.
mary
just a small note to thank you for the inspiration.. for taking the time to answer all the questions ..it really has helped me
Katie
You are so welcome Mary, I am glad that I could help.
Viktoria
I want to make a rag quilt too! Although,must I use flannel for the batting? Can regular batting be used as well? Let me know your thoughts.
Thanks,Viktoria
Katie
You could still use batting if you would rather. If doing that, I would cut the squares of batting smaller than the squares so it doesn't peek through on the ruffled seams.
Carmen
You stated,not to let the flannel into the seam allowance. Could it not be the fluffy seams that make it a rag quilt?
Katie
Thanks for catching my mistake. 🙂 You do want the flannel out past the seam allowance to add to the fluffy seams. I have fixed the text. Thanks Carmen!
Rachel
How did the cotton do with no fraying?
Katie
Th cotton does fray, but in this case, I want it to fray. The frayed edges are what make the blanket and give it the rag quilt look. Thanks for stopping by Rachel.
Elaine
Did you wash the cotton fabric before you cut it into squares? I've cut my fabric and forgot this step!
Katie
Elaine, You can still wash the fabric. Wash on the gentle cycle and put the pieces in a lingerie bag and iron once dry. You can continue without prewashing but in my experience, the pieces tend to come apart when not prewashed.
Angela
Did you wash the fabric before creating the quilt?
Katie
Yes Angela, you want to prewash the fabric so it the fabric shrinks before you sew it together.
Deborah Santilla
I'm confused why sew the X on the layers?
Katie
Great question Deborah. Sewing the X helps keep those three layers of the square together so they won't shift around.
Sylvia Stone
Your blanket is beautiful. I have wanted to make a rag quilt for awhile and you have gotten me motivated. I have a new great niece that was born in July and I want to make her one for Christmas. I have looked at ALOT of patterns etc and yours has really stood out. Yours it is. I have never sewn with Minky fabric before and was wondering about using flannel for inside and for the back. What is your thoughts.
Katie
Hi Sylvia! I am so glad that you like my tutorial. I think you could easily use flannel fabric on the inside and the back of the quilt. That will make it nice and warm. Congratulations on the new Great niece!
Jan
I've made a rag quilt with flannel front and back. I used regular cotton batting and cut it just shy of the seam allowance. It frays up nicely.
Cheryl Mammarello
Is there any issue with shrinkage with flannel being used along with the minky?
Katie
Make sure to prewash the fabric. This will take care of the shrinkage and won't effect the quilt once it is all sewn together.
Lauri McQuaid
Hi Katie! Your quilt is beautiful! I have made several all flannel rag quilts with cotton batting between the flannel squares but have never made a rag quilt with minky on one side....but I'm about to! I just have one question, though...your Tip says:
Tip: Layer all of the pieces before you begin sewing so the stacks can be quickly grabbed. Layer -> Cotton print facing down, flannel, minky facing up.
In the photos though, it looks like the cotton print is facing up and the kinky down when sewing the X's through the layers. Can you please clarify which is the best way to sew them....I'll be using a walking foot but would you recommend Micky side up or down? Thanks! Great tutorial!!!
Katie
Hi Laurie! I'm so glad you like my minky quilt. Great catch, you are right, we did sew them with the minky on the bottom. If I remember right that was because the thread color was the same as the minky so it was easier to see when stitches with the cotton side up. I think sewing it either way is totally fine. Maybe test to see how your machine handles it better, with the minky on top or on bottom and go with that method.
I'd love tos ee a picture of your quilt when you're finished!
Jerrie lynn robinso
What is Minky? Is it like a soft flannel or more like a chenille or thin fleece?
Katie
Hi Jerrie! Great question! Minky is a special type of plush fabric that is like fleece – but softer and thicker. It is great to use for blankets and you often see it with baby items because it is so soft.
Kemail Amrine
I am making a butterfly quilt for my best friend for Christmas. I want to try to make a minking quilt. It sounds soft and cozy. I have a question about it, when you sew the long strips together is it one long seem? And does that effect the look of the frenge? I am excited to see how it comes out. Thank you for all of your help.
Kemail Amrine
Katie
Thank you, Kem! I am excited for you and your butterfly quilt. I am sure it will be beautiful when finished.
The fringed corners of the squares are a little bulky because there is so much fringe at those points. That is totally okay and I don't think it effects the look of the fringe.
Good Luck!!
Katie
Thank you kemail. I am excited for you and your butterfly quilt. I am sure it will be beautiful when finished.
I am not sure I am understanding your question. Sew the layered squares together in rows, making a 5/8 inch seam. Then, stitch the rows together, matching up the seams on each row and keeping the seams all on the same side of the quilt.
Michele
I completed one of these for a Christmas gift, but had trouble with the Minky stretching/shrinking while working with it. Is there a trick to that?
Katie
I'm sorry the minky fabric turned out being a pain to deal with. I try not to sew with stretchy fabric when I can help, so I do a quick pull test on the fabric to see how stretchy it is before purchasing. I did find this really helpful blog post from Generations Quilt Patterns that gives some great tips. I hope you find them helpful. http://www.generations-quilt-patterns.com/sewing-together-quilt-blocks-made-from-stretchy-fabrics-like-jersey-knits.html
Jan
Use a walking foot if your fabric is at all stretchy. It helps to keep all layers moving at the same speed and not shift.
Ty Sexton
Loved the tutorial! Any suggestions on how to keep the minky and the top material equal around the edges? When I cut the minky it gets a little wonky all around the edges. In other words its not the exact same size as my cotton or flannel material. Can I still so it together? Or should I just start all over?
Katie
Thanks, Ty! It sounds like you got a stretchy minky. As long as you can still around the edges of cotton and have it still attach to the minky you should be fine. IF you do need to start over, try to find a minky that has minimal stretch to it.
Melanie
What is the middle layer in your quilt? It looks like a pink mesh, instead of a flannel fabric.
Very cute quilt.
Katie
Hi Melanie, it is a flannel fabric. I'm so glad you like the quilt. Thank you.
Michele Cariveau
I love this! I'm thinking of making a queen sized one for my quest bedroom I want to use 10" blocks, so it won't take forever to make lol!. I think a standard queen is 80" by 80" or 80". But it doesn't have to be perfect ;p. Using 10" blocks, I'll do 8 across, and 8 down. Or, with 6" blocks, I'll do I could do 14 blocks across, by 14 blocks down, for a quilt 84" by 84". A little big, but I think it would be pretty hanging down. I love the gray minky. I think I'll use that with a lot of black and contrasting colors. Thanks for the great post! 🙂
Katie
Thank you, Michele! I love that you are making a larger version for your own bed. I think your plans will work just fine!
lally
Is the pink on the front side the minky material ? If so, how is it not coming apart
Katie
Hi Lally, I'm not exactly sure what you are asking. The minky material is completely pink.
Amanda Lindberg
I have made a couple of rag quilts but always run into problems with bulk. When I sew a row, it is fine.but joining the 2 rows together is where I run into the problem. Where the seams meet- do you just told the bulk to either side so it seems to nest? I think I am thinking too much into it but I never have good luck....
Katie
Hi Amanda! I'm sorry you're having difficulty. Yes, when you sew the seams together it is bulky and it is kind of difficult to get them together. As long as the sewing machine is sewing through all the layers you are good. It will be bulky but the stitch should be fine and will hold it all together.
Susan F
I'm making a bunch for Christmas. I wish I could post a picture.
Katie
That is awesome Susan! You can post a picture on The Crafty Blog Stalker facebook page! I'd love to see a picture! https://www.facebook.com/TheCraftyBlogStalker
Suzanne
Such a cute quilt! How has the minky fabric held up on the rag edges now that she’s been using it? I was going to use minky once and was told the minky would just fall apart and you’d end up loosing the rag edge. Thanks!!
Katie
Thank you, Suzanne. The quilt minky has held up great and the raw edges have been just fine. The minky has lost some of its fluff but it is still snuggly soft.
Cathy
Hi! About to make my first tag quilt. I ordered some Minky that I ordered from Etsy and came today. Just read a card included stating to hang to dry! that a dryer will melt it. ? How is it going to fray? It is my whole backing!
Thank you for any help.
Katie
Hi Cathy! The Minky does not fray, it is the cotton and or flannel fabrics that fray. It is also not the heat from the dryer that makes the fabrics fray but being wet (washed) and then tumbled in the dryer. I would use a very low heat or tumble dry setting the first couple times you wash and then hang dry every time after that. Have so much fun making your first rag quilt!!
Helen
I am going to make my first baby rag quilt using minky as the back with two layers of flannel. I know that the minky will not fray as the flannel does. Now I am worried that when the rag quilt is washed and dried so it can rag, that the mink fuzz will get all over the flannel and keep fuzzing every time it is washed and dried. Is that a risk for the quilt to be used for a baby? I need some peace of mind.
Katie
The minky will shed for the first couple washes and there really isn't a way around that. You could use a lint roller after it is washed and dried to remove those lose minky threads until it stops shedding.
Dawn
Katie,
Did you happen to pre wash/dry your cotton and flannel before cutting your 6" squares?
If not, did you notice a huge change in your quilt after the first wash/dry?
I know flannel shrinks like crazy and cotton shrinks up some.
Katie
Yes, Dawn. You do want to prewash your fabric before you begin cutting your squares.
Annis
Good post. I learn ѕomething totally new аnd challenging on blogs Ӏ stumble upon every day. It's alwɑys exciting to read articles fгom οther authors and practice somеtһing from tһeir websites.
Krestina
Omg I love this blanket !! Your turtorial is great I love the way u explain how to make it it. I never quite understand some blogs and explanations! Yours is off the chain thanks for the tutorial.. you are awesome !
Katie
Thank you so much Krestina! I am so glad I speak your tutorial language! 🙂
Crisstina McCaslin McCaslin
Looks great so decided to give it a try, i didn't realize the fabric would shed so much so clipping it top leaves an endless mess. Did you experience this to with the pink fabric you used? IS there a way to prevent it?
Katie
Yes, the minky does shed quite a bit. My Mom helped me with the quilt and she used a medical mask to help her from inhaling all of the little fibers. I don't know of a way to prevent it, I am sorry. Just a side effect of the minky fabric.
Jenna
I have a lot of minky fabric. Could I use it as the front and back fabric so the whole blanket is minky?
Katie
Yes, you could!! That would be so soft!!!
Mary
I am confused about sewing the X, the photo doesnt seem to show it.
Could younexplain please?
Katie
Layer each quilt square with minky (plush side down), flannel, cotton (pattern facing up). On each square stitch from the top left corner, to the bottom right corner, then from the top right corner to the bottom left corner. This will create a large X on the quilt square and sew the layers together.
I hope this helps Mary. Let me know if you have any more questions!
Donna solomon
When sewing the X I notice that the stitching begins right at the top of the square. Does this area fray consistently with the rest of the quilt? Should I be sure clipped this stitching when cutting the seam allowance for the fraying?
Katie
I didn't make sure to snip and everything still frayed fine, but if you would rather clip it that is just fine too.
Lisa
I’m a bit confused! If you cut through the seam doesn’t it fall apart? Or does the X hold it together?
How do you not cut through all the layers?
Katie
Hi Lisa! You only want to snip the edges up to the seam. But yes, the x does dols the layers together, and the seams hold the squares together. Let me know if you have any further questions.
Deborah Devine
You want to be extremely careful giving any project with raw edge minky fabric to a young child. When I was working in a fabric store several years ago, a customer came in with a tie blanket she had made using minky for her three year old daughter. She also brought in a big wad of those fibers that she had pulled out of the child's mouth. Although the unfinished edges of the minky may stop shedding after a few washes, if a child sucks or chews on it they will still shed and present a choking hazard.
karen
This was very helpful! I've done jean rag quilts, and flannel and cotton ones but now I'm going to do my first Minky rag quilt. Here are my questions:
Do you recommend cotton threads or polyester?
The Minky I have is dimpled. Do you foresee any weirdness about the lack of pattern that will cause on the back?
Does it matter which direction the nap is?
Thanks for your patience with everyone's questions
Katie
Hi Karen!!
I used cotton threads.
I do not foresee any weirdness (?) with the dimpled minky. It will still turn out great!
As for the direction with the grain of the fabric, I cut straight on the grain to minimize stretching.
For more information about grain direction this blog post goes into really good detail and explains it really well.
https://www.thesprucecrafts.com/fabric-grain-facts-for-every-quilter-2821312
Thanks for the questions!
Marsha Reed
A very light water spray keeps the fabric from slipping while sewing.
Katie Adams
Oh, that is so smart!! Thanks for the great tip!
Marilyn Faris
Thank you for your wonderful tutorial.
I made a flannel rag quilt years ago which turned out beautifully but I think my fingers are still sore from cutting the fringes...
Are any of the newer tools easier on the hands?
Katie Adams
I totally understand. I have arthritis in my hands so they easily tire and ache. I haven't tried these spring-action scissors (https://amzn.to/39HnmrX), but now I think I need to! 😂
Tammy Jessie
Katie I can’t thank you enough for this easy to follow tutorial! I’ve searched for instructions through out the web and finally came across yours on Pinterest. After reading this, I tried it and absolutely am in love with this pattern and technique! Sharing is caring❤️ Thank you and I hope to see more🙏🏻
Katie Adams
Yay!! I am so glad you made a minky blanket. ❤️
Katie Adams
I am so glad you like my quilt, Angel. I am sorry that you don't find my instructions clear. As for the clipping ends think of them as seams. Instead of the seams hidden inside, these seams are on the outside, and then you snip them to give them some bulk.