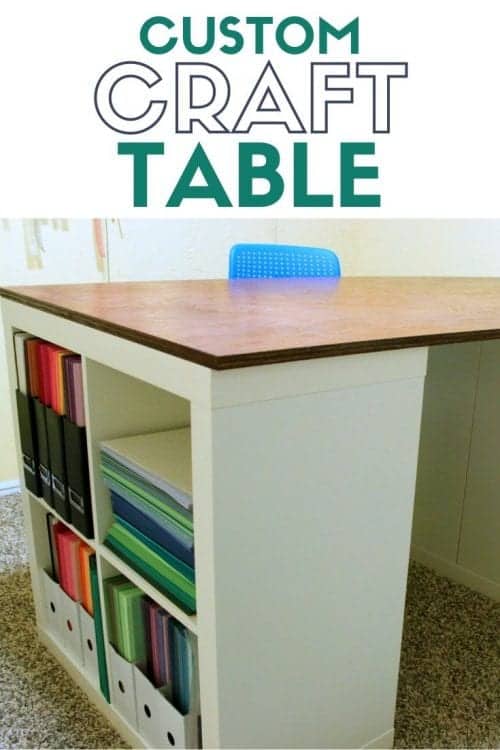
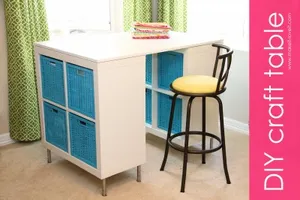
How to make a custom craft table using Ikea Kallax shelves and a tabletop. This is a DIY table that you can make for your craft room. An easy DIY craft tutorial idea.
Is your craft your escape too? My craft room is my favorite room in our house! It is where I spend a lot of my time creating projects and writing tutorials for you.
Since I spend so much time there, I wanted a table that was functional and of course, pretty!
A while ago I posted about My Craft Room because I was doing some major cleaning and organizing.
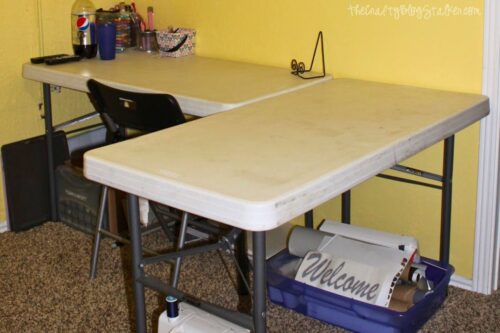
The room was better, but still seemed cluttered those folding tables are just ugly!
I have been eying this craft table from IkeaHackers.net for a very long time.
Over Christmas break my husband was asking me what I wanted for my Birthday (December 30th) and I went straight to this table and said "this". Later that day we were at Ikea, and before I knew it 3 Kallax boxes were on our cart. Yay!
Supplies Used to Make a Custom Craft Table
Some links may be on similar items when exact items couldn't be found online.
- 3 - Kallax Ikea bookcases
- Oak Board
- Stain
- Polyurethane (sealer)
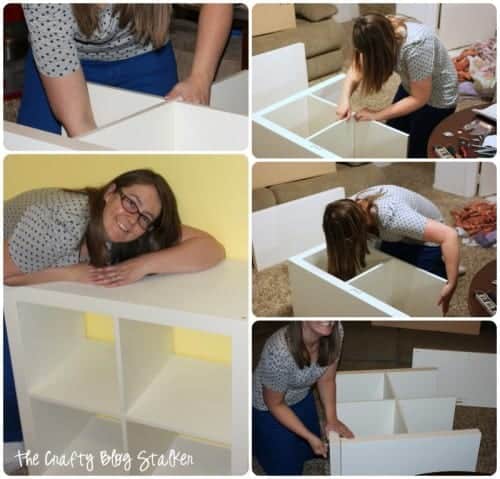
Assembling the Kallax Ikea Bookcases

The shelves are really the easy part, the Kallax Bookcases are pretty easy to put together. That is one of the things I love about Ikea is they make their assembly simple.
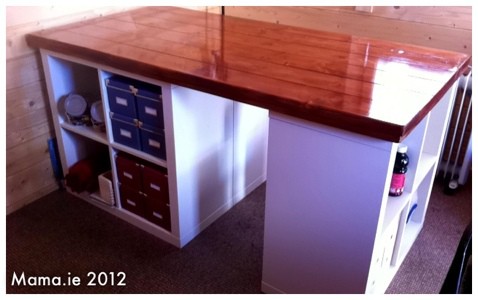
The Wood Table Top
After the shelves were all built we did some measuring so we would know exactly how big we wanted the top to be.
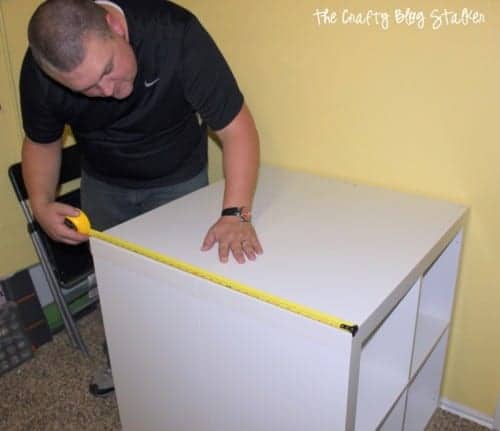
We decided on 32 x 72 inches. That made the top just a little bit bigger so there would be a touch of an overhang and then we wouldn't have to worry about being perfect.
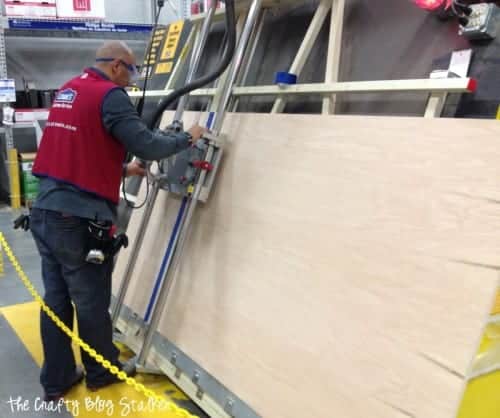
We went to Lowe's to pick out the board and decided on Oak. Vern was very helpful and even cut the board to the size that we needed. I love that they do that!
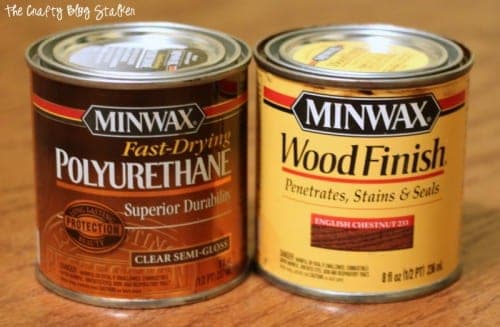
For the stain, I decided on English Chestnut by Minwax. For the polyurethane sealer, I chose the Fast-Drying Clear Semi-Gloss by Minwax.
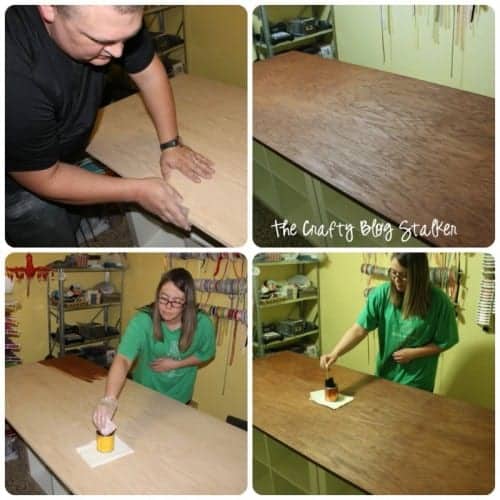
When we got home we laid the board on top of the Kallax units and started by sanding the piece of wood. It was a good piece of wood so it didn't need a lot of prep.
We applied 2 coats of stain and 2 coats of sealer. The hardest part was waiting for it to dry between each coat. I was so excited for my table that I wanted it to be done!
Attaching the Table Top to the Kallex Shelves
When the tabletop was FINALLY dry we started putting it all together. My husband got a drill and impact driver set for Christmas and was very excited to put it to use!
We used 2 flat brackets to secure the 2 Kallax units to each other and used 4 L brackets to secure the top to the units.
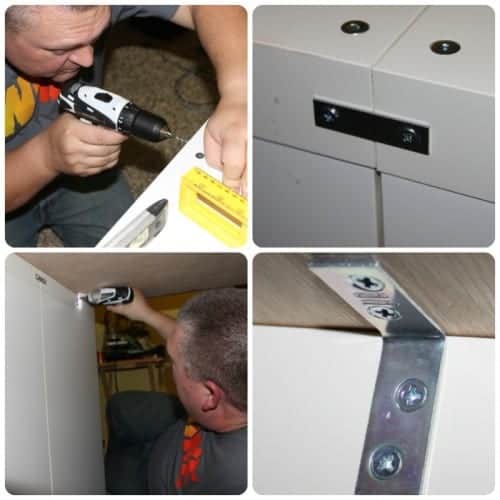
The top was pretty secure, but we wanted to make sure that it wouldn't move at all so we took 4, 2 ½ screws and screwed up through the top of the shelf into the bottom of the table in the 4 corners to make it good and secure. (Sorry, I am a slacker and didn't take any pictures of this step.)
YAY! My Custom Craft Table is Finished!
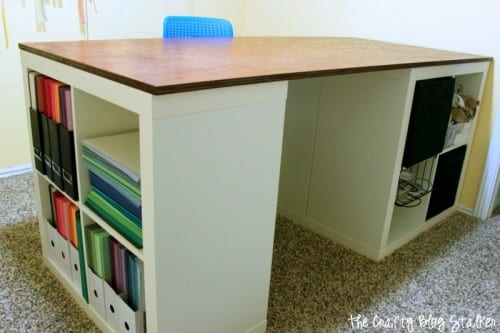
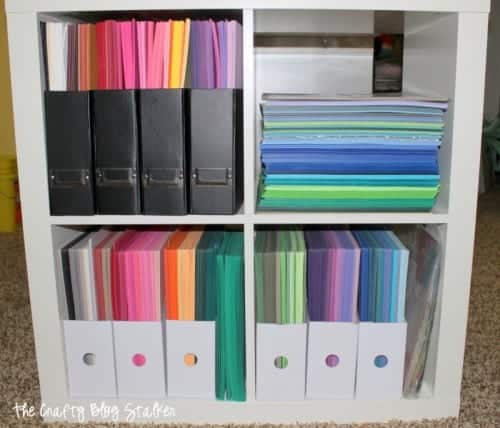
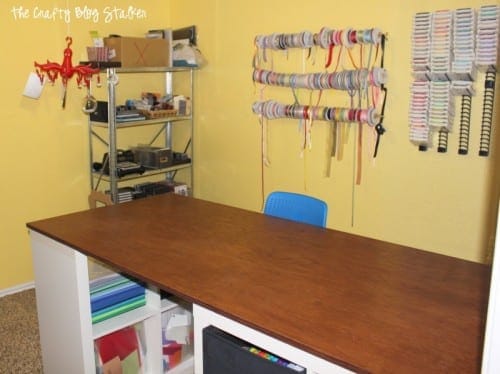
Look at all of that storage! I was able to remove the large paper rack I using that was taking a ton of space!
Now, my room doesn't feel cluttered and I can even walk all the way around my table. I love it!
Would this table work for you as a craft table, or will you make it for something else? Share and leave a comment below.
Follow me on Pinterest and you can see all the DIY projects I'm pinning!
You Might Also Like These Tutorials:
Recommended Posts


Katie Adams
Creator at The Crafty Blog Stalker
- 4 Organization Solutions in My Craft Room
- 25 Practical Tips For Organizing a Craft Room
- 23 Simple Closet Office Design Ideas
- How to Start a Smash Book
- How to Make a Towel Bar Necklace Hanger for the Wall
- 19 Craft Ideas for Your Home Office
- 20 Ways to Use Crystal Light Containers
- How to Make Your Own Earring Holder Frame
- A Review of The Cricut Machine Tool Organizer
Regina
Wonderful! I am contemplating something similar to replace the gateleg base under my cutting table so I will have better storage and a more stable top. I like how you have these fastened -will have to keep this bookmarked! I just wish we had an IKEA closer than 4 hours and a passport checkpoint away.
sue morris
Congratulations!! It looks wonderful!!!
Susan D
This came out awesome! Very jealous of your craft room.
Brooke
This is so awesome! I've been dreaming of one of these! I love the idea of using bookcases. There's nothing like being organized and having a space to work. Yay for you!
Vickie Townsend
Question? What was the thickness of the board you used for the top? Love the table, thanks.
Katie Adams
My board has a thickness of 3/4-inch.
Diana - FreeStyleMama
This is AWESOME! I am soooo jealous! I would do this if I had space!!!
Jenny Melrose
Gorgeous! I love the shape and size. Just perfect.
Smart! School {House}
What I would do to have a table like that in my craft room! Thank you for linking up with us on Whimsy Wednesday! We LOVE seeing you and your pretty projects every week.
Happy New Year,
Kelly from Smart! School {House}
Alison P.
That is awesome! I was thinking about doing something shorter for my little guy! Now I am super jealous and want one for myself...of course, I have to get a craft room first 🙂
Debi @ Adorned From Above
I love your craft table. It is great. I have a link party called Wednesdays Adorned From Above Blog Hop and would love to have you share this and any other posts with everyone. It runs from Wednesday through midnight Sunday. Here is the link to the party.
http://www.adornedfromabove.com/2013/01/week-in-review-and-wednesdays-adorned.html
Debi @ Adorned From Above
Kara @ Petals to Picots
Looks awesome, Katie!
Jennifer Dawn Oliver Shelton
Great table! I love all the storage.
Barbra
Love your new craft table. You are just too creative - you and Paul!
Paula Parrish
Your new crafting table is just simply fabulous. I love seeing the whole process of how it came together, thanks for sharing. ;o)
Karen of Little Red House Designs
Visitng from LiveLaughRowe. Love your table and the stained oak top! I need to make a 'mini' version of this for a sewing table. The top was throwing me off - now I know what to do!
Ana
It looks great! I'm so jealous that you have whole room dedicated to crafting......
tobeamiss
I love your 'birthday present'. and what great storage you have now 🙂 I think one of the most important things to remember is to place it in the center of the room so you have access all around. Great job you and your hubby did.
Lisa
Love it! So pretty and it makes doing crafts so much more fun!
Lizzi's Creations
That is pretty awesome! I must do this! Now following!
Melissa SerendipityandSpice
Nice! I've been thinking about making this same desk for my craft room!!!
Tammy
What a great hubby you've got there! The table turned out great 🙂 Don't you just feel more inspired to create things when you have such a great place for it? I put together a sewing/craft room over Thanksgiving and it's been wonderful 🙂 Thanks for sharing this with us!
umustbkrazie
Oh my goodness! This is an amazing craft room table, my craft room has been pushed into the basement, and I have just this tiny round table to work on, I need to build one of these, lots of storage and work space! Love it!
Valerie@Occasionally Crafty
Love it! I want this table too- i just need a craft room! Right now I have an office/guest bedroom/sewing/craft room. Sigh....someday.....
SchneiderPeeps
What a great craft table! I think I'll have to use that idea whenever I get a craft room. I came over from Adventures of DIY Mom, you have a lovely blog.
Lindsay @Artsy-Fartsy Mama
Genius! I so wish I had a craft room so I could put one of these together. Yours turned out fabulous!!
Thanks so much for linking up at Artsy Corner. You were featured this week, so stop by and grab a button! Hope to see you again this week 🙂
Beth J
Awesome table cant wait to make my own. Ah can I borrow your husband?
Katie Adams
I am glad you love the table, but that my be awkward to barrow my husband! 😉
lovenotesrestylestudio.com
nice! We found you via Pinkapotamus Pink Hippo Party. Share the love and check us out too <3 http://www.lovenotesrestylestudio.com
My Shabby Chic Home
Your new crafting table is fantastic!!!! Love it!!
Have a nice week!
Lorena
angie
What an awesome work space!I saw this on Sugar Bee Crafts and had to come check it out - very nice!!
Crafty Jac
I'm almost sure that I just turned green over here with jealousy! My boyfriend was just asking me what I wanted for my birthday...might have to give it a shot! 🙂
Samantha
Love this table, I found it on pinterest.
Now you've used it a few months would you please tell me whether its a comfortable height to work on standing up? I like to sew and my current table is far too low and I get a sore back but I'm a shorty so want to be able to reach!
Katie Adams
I do think it is comfortable to stand and work at. but if it did end up being too short for you, you could always add some legs to the shelves to give you a couple more inches.
I hope that helps!
ingrid@nowathomemom
beautiful desk, I love how you transformed this! you did a great job! 🙂
visiting from the Winthrop chronicles party!
Ingrid
Angela Paris
Katie,
I saw your thumbnail on Freedom Friday and had to check this out! That desk is totally awesome - I'm so jealous! Do you mind saying what the total cost of the project was?
Ang, Juggling Act Mama
Katie Adams
Not at all. I spent just over $200 on the table. Thanks for asking!
Joann
I'm jealous!!
It looks great.
Lisa Curcio
I'm just more in love with Ikea now! Thanks for sharing!
Peggy Meckling
I drew a picture very recently of my dream craft table that looked very similar to this. Thanks for blazing the trail. It looks fabulous and extremely functional! I just found you through Our Delightful Home. I'm your latest follower. You can find me at crazythriftycrafts.blogspot.com.
{northern cottage}
lovely lovely - what a wonderful gift indeed! i'm a teeny bit jealous!! xo
♥
Meg Sluyter
Hi Katie, I am in LOVE with this table. You did such an awesome job on it too, This would make my life so much easier and more organized if I had one in my craft room. I'm defiantly adding this to my wants for that room. Thanks so much for sharing how to do it and Happy New Years 🙂
Theresa
Oh, love your craft table! I hope we get a chance to make one too. I've pinned a few myself. I love how yours turned out. Happy Crafting!! & 2014! Theresa @DearCreatives
Camila Rojas
WOW I love what you did with those bookcases!!! I need that badly!!!
xoxo
Cami
Rebecca @ My Girlish Whims
Thanks so much for linking up to Your Whims Wednesday, I featured this on my blog tonight! Come stop by and grab a featured button 🙂 http://www.mygirlishwhims.com/2014/01/your-whims-wednesday-145-and-features.html
Carol
That turned out beautifully! You just cannot beat IKEA Expedits for creating perfect storage.
Luciana
Wow! What a Great project! I love your craft table!
One question, where did you get those ink holders?
That's a great idea too!
Thanks!
Katie
They are called media stix. They are meant for for dvds or cds. I got mine at Target but you can also find them online.
jIMMY SPIER
How is the tables durability? I am is worried that the screws will not hold up in the Ikea bookcases since they are card board base.
Katie
I have had this table for over a year and I still absolutely love it! I even had to take it apart and put it back together when I moved, and it is still super sturdy.
Eileen Fullenwider
Could the table top be granite some kind of kitchen counter
Katie
Of course it could. The top could be any material you would like. You may just have to find a different way to attach it.
Genie
This is great!! I've seen similar pins on Pinterest but yours looks even simpler.
I'm wondering though.....couldn't you use one of the IKEA desktops or table tops? Or was it even cheaper to buy and stain the oak board? I'm frugal but also lazy since I don't have a hubster to help with projects.
Just thinking of other options......but I'd do the board if I had to. I love this for even a regular home office desk!
Katie
You could totally use a premade IKEA tabletop and not have to worry about staining. I wanted to stain so that is why I went with that.
Erikasunder5
I absolutely love the idea! I love that you used 3 shelves!
Would the table surface be ok if you spilled water or something?
Katie
Thank you! Since I sealed the wood, water doesn't hurt the table at all.
Jocelyn
What type and size screws did you use, if you remember? Thank you! I got bookcases to replace the Ikea cubby bookcases I have and decided to pull the Ikea cubby bookcases I have out and put it under the Ikea tabletop. Just need to drill it together. Also, I noted you used an impact driver, is that necessary? Thank you!!
Katie
Jocelyn - are asking about the screws that held the L Brackets? My table top is 1/2-inch thick so I used 1/4inch length screws. The biggest thing is you don't want the screw to poke up through the top of the table top.An impact driver isn't necessary, my husband was just excited to use his because he had just gotten it as a present.
Good luck! I would love for you to send a picture over when your's is finished. You are going to love it!
Sue N.
Making your table this weekend. We picked up the oak plywood from Home Depot today! So excited!! Thanks for the tutorial.
Katie
That is great Sue! I would love to see a picture when you are finished.
Cindy Magee
Oh, how I wish I had a craft room and if I did, this table! So much fun!! 🙂
Katie
Thanks Cindy! I really do love my craft table!
Grandmas House DIY
I'm jealous! This turned out just awesome! Thank you for sharing with us at the To grandma's house we go link party last week, you will be featured in tomorrow's party, hope to see you there!
Katie
Thank you! I am so glad that you like my craft table. I have really enjoyed having it.
Becca
Beautiful! My husband is always getting on me because my craft stuff gets a little out of control...little by little i am taking control of it again and would love someday to have a space like this!
Katie
Thanks Becca! I am so glad that you like this craft table.
Jennifer Worrell
Beautiful! One of my teaching colleagues just replaced her school desk with something similar! It's amazing! WOW!
Katie
Thank you, Jennifer! It is a super functional desk!
sherry cole
Your table is amazing! I am choosing your table as my feature at Totally Terrific Tuesday tomorrow.
Katie
Thank you Sherry! I am so glad you like the table. I have loved having it!
Allison
I absolutely LOVE this idea! Can't wait to move into our new home and actually have room for a craft table!! Thanks for the inspiration!
Katie
Thanks Allison! When you make it I'd love to see pictures!
Hana
Wow, this looks awesome. I would love to make this but unfortunately, there's not much space in my house. Hopefully, I'll great a bigger place to make one of this table. Great DIY!
Katie
I'm so glad that you like this table! One of the best things about this table is that you can decide the table-top size!
Janey Backer
Where did you get your paper storage - magazine things? Are they still sturdy now a few years later?
Katie
Great question Janey! For the 8 1/2x11 paper, I got the holders at ikea. They are sturdy cardboard. For the 12 x 12 paper, those came from Hobby Lobby. I've now had both types for several years and they are still holding up great!
Rita Boettner
what are the dimension of the top piece ?
Katie
The top piece of wood is 72 by 32 inches.
debbie Phillips
Would you mind telling me the size of your craft room? Mine is a little over 8 x11 and was wondering if this would fit?
Katie
Hi Debbie, I have actually moved from this home where I put the table originally but my guess is about 10 x 10. It wasn't a very big room. It is now in my new craft room that is larger and I still love it!
Andrea
Katie
Do you have a regular chair of adjustable stool for your craft table? I was wondering if it would be tall enough to sit or stand and use an adjustable high back stool.
Katie
HI Andrea! I have two different chairs that I use at my table, depending on what I am doing. I have an adjustable office chair that has wheels on the bottom. This isn't a super comfy chair so if I'm going to be at my table for awhile I have a cushion bar stool height chair that I sit at. But this is just a smidgen too high so it is more difficult to get in and out of the chair. So both totally work, but I wish I would have made it a smidgen higher and my bar stool chair would be my chair of choice. Sorry for the long explanation. 🙂
Sophia Marx
Hi there. How are you liking the configuration of the book cases under the table? Is your stuff easy to access?
Katie
Hi Sophia! Yes, The configuration works for me because I can easily access all three bookcases. I love it!
Brenda Luckett
Hi Katie,
Quick question about the table top. Is it an Oak Plywood? Did they use a 4 x 8 size and cut it down for you? Do you think a paint would work well on it?
Thanks!
Brenda
Katie
Yes, they cut a larger piece down to the size that I needed.
And I think paint would work just fine as long as you still sealed the surface.
Root
got there! The table turned out great ? Don’t you just feel more inspired to create things when you have such a great place for it? I put together a sewing/craft room over Thanksgiving and it’s been wonderful ? Thanks for sharing this with us!
Katie
Thank you, Root! Yes, I definitely feel more inspired when I am in my craft room. ❤️
Ayesha Allesee
Please can you explain how to finish the edges of the tabletop board?
Katie
I am sorry that was unclear Ayesha, I sanded the edges just as I did the top, stained, and then sealed it with polyurethane.